Case Studies
High performance linescan inspection
Clutch Manufacture
Rising quality requirements on clutch manufacturers in the automotive industry demands a practical strategy in determining that the correct quality level has been reached in all areas of manufacture. Industrial Vision Systems Ltd have developed a system for the Gertrag company which offers a complete automated image processing solution for teeth and clutch body inspection. Pre-requisites for the system included a rapid and configurable user interface, coupled with the ability to show real-time feedback to the operator for problem parts, and trends emerging from the manufacturing process.

The main problem was the large variety of parts they manufactured, up to 18 different body styles with different levels of teeth quality for each unit. Each part must be inspected against 7 different criteria: gate width, plan impact (by comparing the gate widths), symmetry, tooth profile and situation, tool failure and roof form angle.
Test Sequence
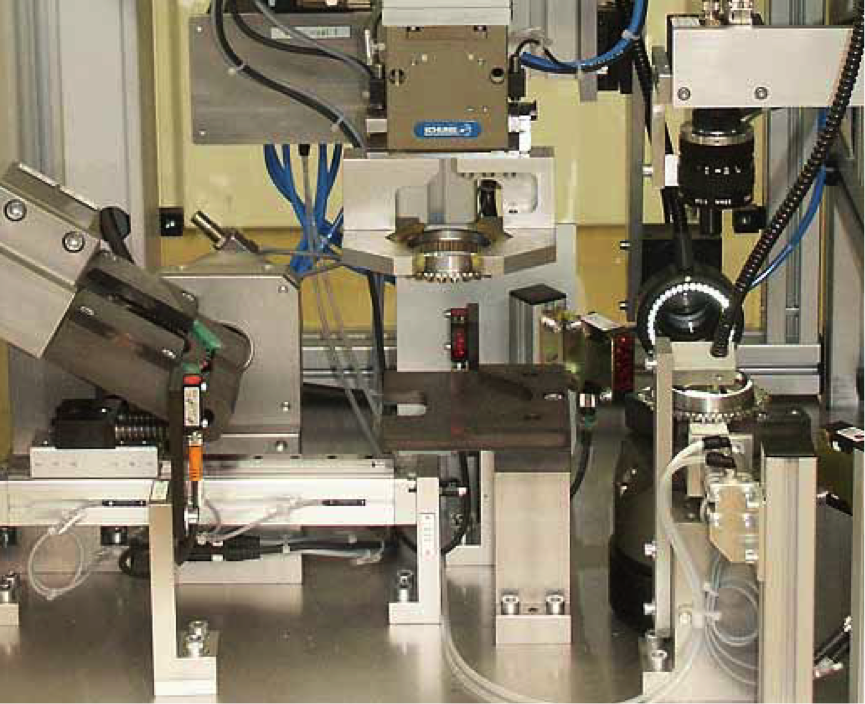
The bodies to be inspected are initially isolated on a separate conveyor. All 18 types are then driven down this conveyor channel, giving an optimal reference plane for the image processing system to work from. As the parts enter the machine a pneumatic x-y handling system moves into position over the part and takes it to the inspection station. Once the workpiece is centred in the fixture the pneumatics are called to move the tool until the edges are met, giving ultimate control over the number of types available.
The test piece is then rotated through 360 degrees, with a +-10% overspin, which means a start position does not have to be referenced. On the axis of rotation an encoder syncronises the movement of the test piece with the trigger to the cameras. The surface is scanned using 2 x Digital CCD linescan cameras, so one camera operates from above and the other at 90 degrees to the part. The total time for the rotation and build of the image is 1.7 seconds for both cameras in total. The system gives an accuracy of 270microns which is based on 10,000 increments per rotation. This gives a resulting image size of 11MB from each camera. So in total including grabbing the image the complete system inspects in 3.5 seconds per part. The results of the evaluation are then sent back to the PLC via digital I/O connections for further processing.
An important part of the whole system is the reliable and exact nature of the lighting and optics used – giving repeatable and dependable results. For the system two fibre optic LED light sources are used in conjunction with focusing ring light interfaces. The optics for the system was based on 50mm focal length precise lenses.
Software Solution
As discussed previously there were a number of criteria to be met within the system, hence a multi-criteria machine vision software solution was required. The IVS software has the ability to sub-divide the inspection criteria into discrete steps (called “Individual Checks”) which make up a “Check Routine”.
This unique ability to offer multi-criteria inspection, in tandem with the ability to save data to Excel in real time, gives the system ultimate power for detailed analysis of the failures.
The software will collate statistical information for the above individual errors, it is also possible to save individual images of the failed parts to give a visual database of any errors occuring.
The total solution gives unparalled results in the quality inspection of gear parts for Gertrag. The system is characterised by simple, clear operation and a high degree of reliability. Changes to parameters are password-protected on the shop floor and the system is networked via an ethernet connection to the machine. Therefore any new parts added to the system can be set-up via engineers from the comfort of their desks.
In conclusion the vision system provides a clear method for automated visual inspection and continues to be the system of choice for manufacturers requiring 100% quality control.


