4 common red flags in your product design that will cause you trouble during automated vision inspection

This month, we’re going to discuss the aspects of design in your product which could affect the ability to apply automated visual inspection using vision systems to the production process. This can be a frustrating aspect for the engineering and quality managers when they’ve been asked to safeguard bad products going out of the door using machine vision, but there has been no attempt up the chain at the product design stages to either design the product in an effective way to make it simple to manufacture or to apply vision inspection to the process. Once the design has been signed off and validated, it’s often extremely difficult to get small changes instigated, and engineering is then tasked with the mass production and assembly of a product, with in-line visual inspection required.

Very often in medical device manufacturing, due to the long lifetime and cycles of products, the design was conceived months, or even years before it goes through a process of small batch production, before moving to mass production at high run rates – all this with the underlining aspect of validation to GAMP and FDA production protocols. This is the point when automated inspection will be integral to the quality and safeguarding of the consumer as part of the manufacturing process.

From our experience, we see the following red flags which could have been addressed at the design phase, which make the vision system more difficult to design and run.

1. Variants. Often, there can be too many variants of a product with additional variants of sub-assemblies, which means the number of final product variations can run to hundreds. While the vision system may be able to cope with this variation, it makes set-up more costly and ongoing maintenance more difficult. Sometimes, these variations are due to multiple customers down the line wanting subtle changes or unique part numbers, which the design team happily accommodate with no thought on the impact on the manufacturing process. The more variation which can be removed from the design phase, the easier and more cost-effective a solution for machine vision inspection will be.

2. Lack of specification in surface/material conditions. The settings for a machine vision system will depend on a product’s surface and material conditions. This is especially critical in surface inspection or any process where the segmentation of the background is required from the foreground – so presence verification, inclusion detection and even edge detection for gauging and measurement in machine vision. Suppose conditions vary too much due to a lack of specification on colour or surface being included in the design. This variation can make the vision system more susceptible to false failures or higher maintenance. While latest-generation artificial intelligence (AI) vision systems are making such analysis easier and less prone to failure in these conditions, having as little deviation in your incoming image quality for vision inspection makes sense. The design should include a specification on the surface conditions expected for repeatable manufacturing and inspection, which, for example, in plastic mould colour specification can be challenging to specify.

3. Inability to see the inspection area. In the past, we’ve been asked to automatically inspect surfaces which can’t be seen due to a lack of clear view from any angle. The product’s design is such that perhaps datum edges and points are too far away and not easily accessible. The design could be such that an overhang or other feature obscures the view. This is often the case in large sub-assemblies where the datum edge can be in a completely different area and angle to the area where vision inspection will be applied. Design engineers should assess the feasibility of applying automated inspection to the process to account for how easily the vision system can access certain areas and conditions. We often discuss such applications with manufacturing engineers, with the frustration from their side that the design engineers could have incorporated cut-outs or areas which would have provided a clear line of sight for the vision system to be applied.

4. Handling. Products should be designed to be easily handled, fed and presented to a vision system as part of the process. There will nearly always be a contact surface on tooling for handling, which will then limit the area where the vision system can view. Sometimes, this surface requires critical inspection, and the site is obscured due to the product’s design. For example, in syringe body inspection, the plastic body can be held by the top and the bottom and rotated, meaning some areas of the mould are not visible. If a lip had been designed in, the part could have been inspected twice, held differently, thus providing 100% inspection of the entire surface. Small design changes can impact both the manufacturing and automated vision inspection process. Smaller products can be inspected on glass dials and fixtures to mitigate this issue, but the design team should consider these issues at the start of the design process.

Product design needs to get input from the manufacturing and quality team early in the design process. Now vision systems are a standard part of the modern automated production process and an invaluable tool in the industry 4.0 flexible production concept; thought needs to be given to how subtle design changes and more detailed specification requirements on colour and surface quality in the design stage can help the integration and robust use of vision systems.

IVS and AMRC announce smart workbench of the future

A next-generation smart workbench to showcase the latest production technologies has been developed by IVS in collaboration with AMRC Cymru. The Smart Workbench combines a mixed reality headset, smart tooling, 3D and 2D machine vision, seven-axis robotics, intelligent projection, pick-to-light and automation into one complete demonstration cell. The bench is designed to showcase the combined use of these cutting-edge technologies in a cell which can be used for demonstrations, research and development at AMRC Cymru, which is part of the University of Sheffield Advanced Manufacturing Research Centre (AMRC) and the High Value Manufacturing Catapult cluster of research centres.

IVS combined the mixed reality environment with the various disparate tools and robotic assembly build, providing a step-by-step process control for an engineer to follow. With the mixed reality unit being an integral component, IVS has developed a template for an immersive inspection environment to assist users. AMRC Cymru will then use the data gathered from these processes to dig deeper into the potential applications of these tech combos in future manufacturing settings.

Earl Yardley, Industrial Vision Systems Director, said: “We’re very excited about the work we have completed with AMRC Cymru. We see the increased use of Mixed Reality combined with industrial automation and machine vision as a pivotal technology for next-generation factories. Imagine operators with physical items around them, such as components and assemblies, but with the ability to also interact with digital content, such as a shared document that updates in real-time to the cloud or instruction animations for assembly. That is, in essence, the promise of mixed reality. It’s an incredibly exciting technology for future production environments.”

The smart workbench also combines both 2D and 3D machine vision. By generating a point cloud of information, 3D machine vision enables the vision system to inspect and confirm positional off-sets with the robot, facilitating the automated inspection of complicated assemblies, subassemblies, and individual components. Together with a collaborative seven-axis robot arm, this enables the benchtop assembly of parts on the smart workbench. This is an essential area of research for future manufacturing settings since it can be paired with the pick-to-light system for full collaboration between humans and robots.

Andrew Silcox, research director at AMRC Cymru, said: “We are delighted to be working with IVS to develop SMART workstation applications for our industrial partners. AMRC Cymru believes that SMART workstations equipped with collaborative robot technologies will be a key component of our future factories as they enable us to merge the productivity and repeatability of automation with the adaptability and dexterity of a human.”

The smart workbench also includes operator traceability and security with RFID (Radio-frequency identification) tags providing the ability for the bench to adjust according to the operator’s height and store data against the operator ID. This is linked to the factory information system at AMRC Cymru, and, ultimately to AMRC’s bespoke Factory+ demonstrating how data exchange to factory information systems, and clear human-machine interfaces, are critical elements for the factory of tomorrow.

It is hoped the Smart Workbench can be utilised by all members and visitors of AMRC Cymru to research future ideas and concepts for manufacturing knowledge. Combining different production process elements in unique combinations, the smart workbench is seen as a modern tool for the future of manufacturing technology.

Zytronic invests in IVS capital equipment to deliver future growth

Zytronic – the projected capacitive touch technology specialist – has invested approaching £400k in a second bespoke laser soldering system installed within another factory cleanroom, providing risk mitigation and interchangeable production capabilities across the entire UK-based manufacturing operation. Industrial Vision Systems Ltd (IVS), a global supplier of precision visual inspection systems and industrial automation solutions, developed the unique automated vision & laser welding system in collaboration with the Technical, Quality and Production teams at Zytronic.

This new automated system allows Zytronic to leverage the latest production technology, providing increased productivity, higher yields and enhanced manufacturing capability. The machine combines 2D camera vision with precision drives, and custom software to deliver precise, contactless laser welding of controller flex tails to the touch sensors. This capability increases Zytronic’s ability to complete the critical soldering process on its glass and film projective capacitive (PCAP) touch sensors, even in small quantities, irrespective of size or design in record time.

“The investment in this next-generation laser bonding system supports our continued drive for yield improvements and accelerating throughput,” said Mark Cambridge, Managing Director, Zytronic. “One of the key areas we have advanced with this new production cell is the precise soldering of our 10-micron diameter copper sensing elements to the microns-thin gold/tin pads within the flexible tails that we use to connect to our proprietary touch controllers. This new and more advanced system complements the one we installed in another cleanroom a few years ago and mitigates the risk associated with only having one laser soldering system available to production.”

Earl Yardley, Industrial Vision Systems Director, said: “We’re thrilled about the work we have completed with Zytronic. This new production cell combines all the latest automation know-how and is a pivotal technology for precision laser welding with closed-loop vision control. It was an incredibly exciting project to work on, which will accelerate Zytronic’s touchscreen manufacturing capability and flexibility.”

Zytronic’s continued investment in its UK touchscreen manufacturing operations positions the company to take maximum advantage of new opportunities as its global customer base recovers from the effects of the COVID-19 pandemic. Combining cutting-edge CNC and vision-based automation, the laser soldering unit is seen as a modern tool for the future of manufacturing technology. The machine’s software incorporates operator and material traceability, automatically saving the data to Zytronic’s manufacturing and QA system. This capability will enable statistical process control and data archiving for customer warranty and product traceability once the projective capacitive touch sensors are deployed in self-service, industrial and commercial applications around the world.

www.zytronic.co.uk

11 ways machine vision is used in electric vehicle battery production

Here at IVS our vision system solutions are utilised for the inspection of electric vehicle battery production. We thought it would be interesting in this post to drill down a little more of how machine vision is used in this fast-developing industry sector.

How are electric vehicle batteries made?

Carbon or graphite, a metal oxide, and lithium salt are all used to make lithium-ion batteries for electric vehicles. Positive and negative electrodes are made up of these elements, which when mixed with electrolyte form an electric current that allows the battery to work to power a car. It’s also the same type of battery that’s used in common devices like cell phones and computers, but on a far larger scale.

The materials used to make EV batteries come from many different countries and sources. Subterranean ponds are the most common source of lithium. The ponds liquid is drained out and left to dry in the sun. The Andes Mountains, which span through Chile, Argentina, and Bolivia, provides a large portion of the lithium used in electric car batteries. There are additional rock-mined deposits in China and the United States. The cobalt used in electric vehicle battery production mostly comes from mines in the Democratic Republic of Congo. Nickel is largely gathered in Indonesia and the Philippines. Lithium is converted to lithium carbonate, which is subsequently processed at a battery plant. The batteries are assembled at the production factory and then installed in an electric vehicle with zero emissions.

EV’s employ a pack, which is made up of thousands of separate Li-ion cells that work together, rather than a single battery like a phone. Electricity is utilised to make chemical changes inside the car’s batteries while it is charging. These adjustments are reversed when it’s on the road to generate electricity.

So how is machine vision used in a battery plant?

Machine vision is used in the complete electric vehicle (ev) manufacturing cycle, providing quality and consistency to the production across all areas. But getting the quality right on battery production for electric vehicles is critical for safety, life cycle and achieving greater energy density – and to prevent degradation and to minimise waste. Therefore, machine vision provides the eyes on quality in electrical vehicle manufacturing, providing 100% inspection, around the clock. From work we have done we can drill down on the 11 critical areas that machine vision is used in electric vehicle battery production for in-line quality control.

1. Coating quality inspection. During the initial coating process, linescan vision inspection is used to check for defects such as scratches, dents, dints, craters, bubbles, inclusions and holes on electrode sheets.

2. End face profile measurements. The end profiles can be continually monitored to quality assess the black electrode coating process and raise alarms in case of faults identified.

3. Coating width measurement. The anode and cathode coating has to be extremely consistent and to measurement specification. Therefore, surface inspection combined with gauging width and edge profiles helps to build up an inspection profile for the continuous coated product.

4. Electrode tab position and surface verification. During vacuum drying, a separator and electrode are brought together in cell construction. Cathode and anode cells are wrapped, rolled, or stacked together. The folded cells have lead tabs attached to them. When the cells have been loaded with electrolytes, vacuum-sealed, and dried, the procedure is complete. This process is monitored by vision inspection for anomalies and out of tolerance product. Critical to quality (CTQ) parameters are assessed in real-time.

5. Battery module defect detection. Each battery module will generally contain a number of cells (typically twelves). The modules are joined together and a cooling fluid pipe is attached. Checks for verification for module integrity, assembly characteristics and component verification are all completed using machine vision.

6. Stacking alignment and height. As modules and battery slices are built up into a complete battery pack, vision sensors measure the profile of the slice displacement and positioning to provide accurate feedback control for precision stacking.

7. Tab inspection. The tabs on the edge of each slice and subsequent modules are checked for debris, chips and cracks. Any small burr, edge deviation or dent can cause issues for the final assembled battery unit.

8. Connector Inspection. The main entry and exit to the battery module is via a high-voltage connector. The battery is charged through this connection, and electricity is delivered to the electric motor. Inspection of the main characteristics of the connector assembly are critical to provide a final check for edge deviations, male/female connector profiles and no cracks or dents in the connector profile.

9. Pouch surface inspection. Automated cosmetic inspection for inclusions, surface debris, scratches, dents and dints ensures that the lithium-ion cells are checked prior to becoming an EV battery.

10. Code reading. Codes on the battery modules need to be read for traceability and to track each element through the production process, allowing the manufacturing to trace where an EV cell is finally installed, from the individual production plant, down to the individual vehicle.

11. Final assembly verification. The final battery pack is checked for completeness to specification, all necessary assembly parts are available and verification of optical character recognition of codes for full traceability of the pack when sent to the customer for installation into the electric vehicle (EV).

For further details on IVS automotive industry solutions see: https://www.industrialvision.co.uk/industries/automotive

The 7 elements of a machine vision system.

For today’s post we thought we’d take you back to the beginning. Not all customers have used machine vision or vision systems in their production process before, many will be new to machine vision. So it’s important to understand the basics of a vision inspection system and what the fundamentals of the overall system look like. This helps to understand how a vision inspection machine operates at a rudimentary level.

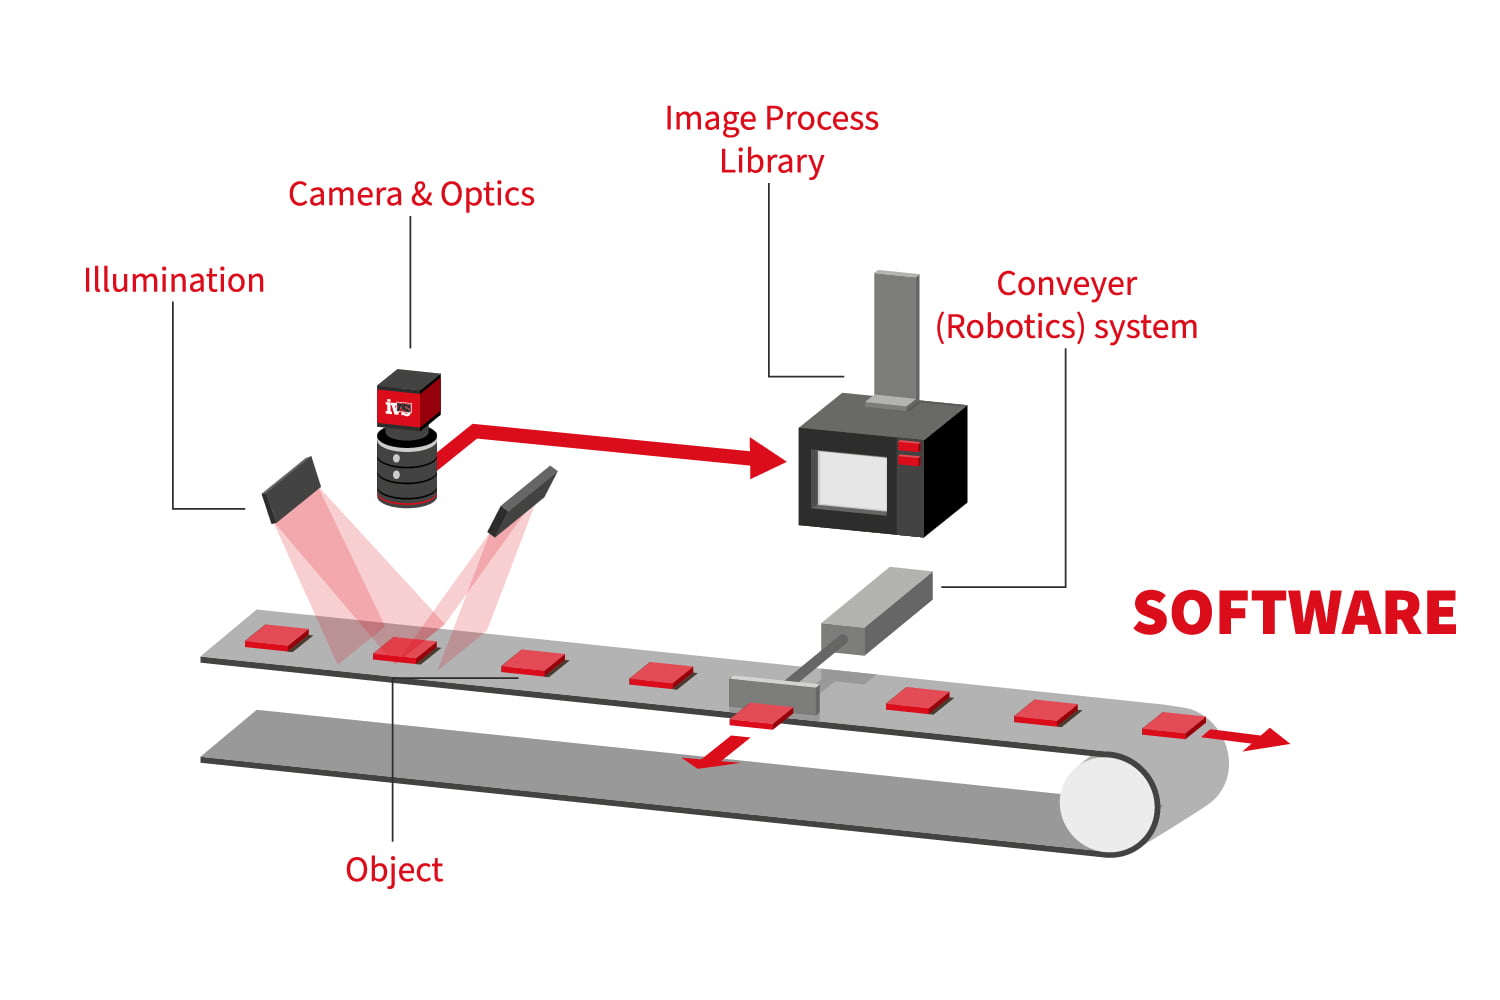
The components of a vision system include the following basic seven elements. Although each of these components serves its own individual function and can be found in many other systems, when working together they each have a distinct role to play. To work reliably and generate repeatable results it is important that these critical components interact effectively.

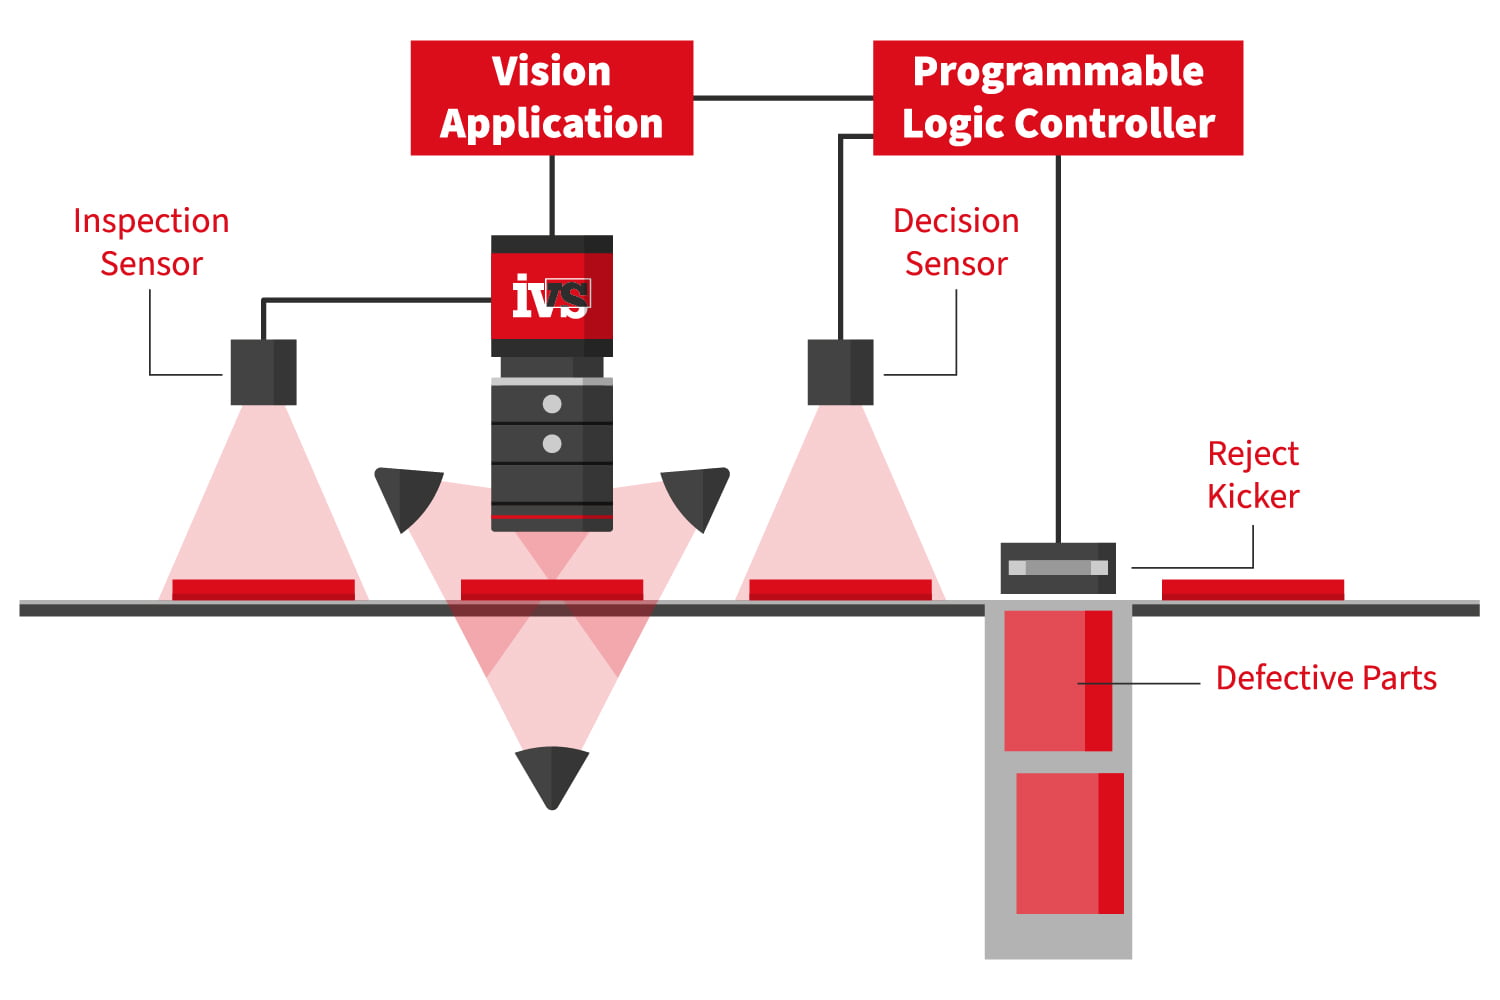
  • The machine vision process starts with the part or product being inspected.
  • When the part is in the correct place a sensor will trigger the acquisition of the digital image.
  • Structured lighting is used to ensure that the image captured is of optimum quality.
  • The optical lens focuses the image onto the camera sensor.
  • Depending on capabilities this digitizing sensor may perform some pre-processing to ensure the correct image features stand out
  • The image is then sent to the processor for analysis against the set of pre-programmed rules.
  • Communication devices are then used to report and trigger automatic events such as part acceptance or rejection.

It all starts with the part or product being inspected. This is because it is the part size, specified tolerances and other parameters which will help to inform the required machine vision solution. To achieve desired results the system will need to be designed so that part placement and orientation is consistent and repeatable.

A sensor, which is often optical or magnetic, is used to detect the part and trigger:

  • the light source to highlight key features and
  • the camera to capture the image

This part of the process may also include what is often referred to as ‘staging’. Imagine a theatre and this is the equivalent of putting the actor centre stage in the best possible place for the audience to see. Staging is often mechanical and is required to:

  • Ensure the correct part surface is facing the camera. This may require rotation if several surfaces need inspecting
  • Hold the part still for the moment that the camera or lens captures the image
  • Consistently put the part in the same place within the overall image ‘scene’ to make it easy for the processor to analyse.

Lighting is critical because it enables the camera to see necessary details. In fact poor lighting is one of the major causes of failure. For every application there are common lighting goals:

  • Maximising feature contrast of the part or object to be inspected
  • Minimising contrast on features not of interest
  • Removing distractions and variations to achieve consistency

In this respect the positioning and type of lighting is key to maximise contrast of features being inspected and minimise everything else.

Of course, an integrated inspection machine will have all of these aspects already designed and taken care of within the scope of the quality inspection unit, but these are some just some of the basic elements which make up the guts of a machine vision system.

Industrial Vision Systems launches optical sorting machines to drive efficiency and minimise waste

Industrial Vision Systems (IVS), a supplier of inspection machines to industry, has launched a range of new optical sorting machines specifically for the high-speed sorting of small components such as fasteners, rings, plastic parts, washers, nuts, munitions and micro components. The devices provide automatic inspection, sorting, grading and classification of products at up to 600 parts per minute. The systems intercept and reject failed parts at high speed, discovering shifts in quality, and providing quality assurance through the production cycle.

The new Optical Sorting Machines from IVS utilise the latest vision inspection algorithms allowing manufacturers to focus on other activities while the fully automated sorting machines root out rogue products and make decisions on quality automatically. For classification checks, the systems use Artificial Intelligence (AI) and Deep Learning, providing the machines with an ability to “learn by example” and improve as more data is captured.

The glass disc of the machine provides 360-degree inspection enabling the system to act as the ‘eyes’ on the factory floor and record production trends and data. By intercepting and rejecting failed parts at high speed, it gives manufacturers the ability to provide 100% automatically inspected product to their customers, without human intervention.

With real-time data and comprehensive reporting to see defect rates, this enables engineers to immediately respond to problems and take corrective action before products are delivered to a customer.

Andrew Waller, director at Industrial Vision Systems, said: “Our machines allow manufacturers to stay ahead of their competitors. These new systems are designed for manufacturers of mass-produced, small products which previously would have struggled to sort quality concerns. We can perceive and detect defects others miss at high-speed. Our optical sorting technology takes vision inspection to the next level. Clear, ultra-high-definition images allow our new generation of systems to recognise even the hardest to spot flaws and to sort wrong batch parts. This allows our customers to achieve continuous yield reductions, categorise failures based on their attributes, and build better products.”

Industrial Vision Systems launches smart Ai vision sensors for high-speed inspection

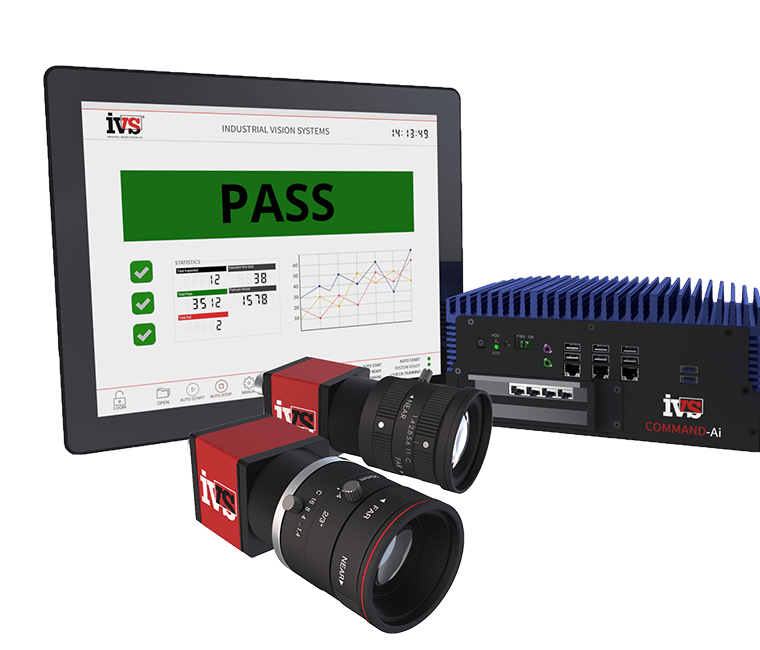
Industrial Vision Systems (IVS®), a supplier of machine vision systems to industry, has launched the IVS-COMMAND-Ai™ in-line inspection solution designed for high-speed automated visual inspection, helping reduce manufacturer fines and protecting brand reputations. The IVS-COMMAND-Ai Vision Sensors integrate directly with all factory information and control systems, allowing complete part inspection, guidance, tracking and traceability with additional built-in image and data saving.

For those applications requiring complex classification, the IVS-COMMAND-Ai system utilises the latest deep learning artificial intelligence (ai) vision inspection algorithms. New multi-layered “bio-inspired” deep neural networks allow the latest IVS® machine vision solutions to mimic the human brain activity in learning a task, thus allowing vision systems to recognise images, perceive trends and understand subtle changes in images which represent defects.

Designed for complex manufacturing industries such as medical devices, pharmaceuticals, food & drink and automotive, the IVS-COMMAND-Ai Vision Systems are fitted with adaptable HD smart cameras to provide inspection from all angles and at high precision. This allows production lines to review and alert any flaws and defects in real-time, providing instant factory information on compatible devices. It also possesses speeds of up to 60 frames per second and can quickly be integrated on-line to inspect high speed and static products.

By achieving a robust inspection performance, the new IVS-COMMAND-Ai Vision Systems oversees complex vision inspections such as presence verification, OCR and gauging through to surface, defect and quality inspection in one solution. Comprehensive Statistical Process Control (SPC) data also provides closed-loop control to further safeguard production.

All IVS vision sensors can be integrated onto production lines, assembly cells, workbenches, robots and linear slides. Their robust design allows vision sensor integration into any industrial production process for seamless inspection, identification or guidance.

Earl Yardley, director at Industrial Vision Systems, comments: “Our vision systems are very easy to program, are highly accurate, offer easy maintenance and provide peace of mind in final quality acceptance. However, the IVS-COMMAND-Ai vision systems take it a step further. It is the complete, robust quality control inspection vision sensor solution, and it is ready to be deployed in all manufacturing environments. It will improve yield and deliver immediate improvements to product quality; and at these critical times, reliability and consistency are vital.”

Vision Sensors

Industrial Vision Systems enters 20th year in business

IVS continues to spearhead the automation revolution supplying some of the world’s leading brands with machine vision technology.

Oxford, United Kingdom, March 1, 2020 – Industrial Vision Systems (IVS®) is celebrating its 20th anniversary as a leading global machine vision provider. Founded in 2000, IVS has since grown to now serve customers around the world, with the supply of thousands of vision systems over their impressive 20-year growth.

“We’re very proud to see what IVS has become,” said Earl Yardley, Director, one of the co-founders of IVS. “We started IVS by mastering our clients’ production and quality control challenges. Reflecting on the continuing success we’ve had, it’s a reminder that we are still on the right path, particularly with the growth of machine vision, and the advent of deep learning and artificial intelligence in vision system deployment.”

With proficiency in machine vision, robotics and industrial automation, IVS has developed a comprehensive suite of standard vision inspection machines, combined with hundreds of unique solutions to service major industries such as medical device, pharma, automotive, electronics and packaging.

IVS’s impressive growth can also be credited to the rise of machine vision and automation within production processes. Through standalone projects and complete automation lines, IVS’s global team has demonstrated its indisputable capability to support their customers at every step of the project process.

Andrew Waller, Director and co-founder, added: “IVS has an outstanding engineering team, who together address some of the most demanding and complex machine vision applications. Our team’s enthusiasm to understand and be tested by our customer problems has kept us focussed on being innovative, to ultimately further develop the company so that we can rise to any challenge over the next twenty years. We want to thank all our customers and employees for their trust and commitment which has made IVS one of the most respected machine vision suppliers to industry today.”

Launched in 2000, IVS vision systems are used all over the world in automated production processes for inspection, guidance, identification, measurement, tracking and counting. Its systems are reputed to be some of the most innovative and advanced machine vision solutions on the market today, successfully deployed in thousands of systems around the world.

IVS launches new features across vision inspection machines

Industrial Vision Systems Ltd (IVS), a supplier of quality control vision systems to industries including medical device, pharmaceuticals, automotive, food and electronics, is launching a series of new features across its full range of inspection machines. This innovative functionality, which includes multi-language support and updated inspection features, is designed to give manufacturers increased brand and warranty protection and to allow systems to be deployed in more diverse production environments.

IVS’s new multi-language support means the visualisation of process information can now be displayed in real-time between supported languages. These include English, Chinese, French, Italian, Polish, Portuguese, Romanian, Spanish and Czech. To conform to the Machinery Directive of the European Union, languages can be switched during the automatic operation of the IVS system. This will benefit IVS’s growing international customer-base who are integrating its systems and machines in global locations, as well as UK manufacturers with a diverse ethnic workforce.

Inspection capability has also been upgraded. One such function is contour matching for enhanced verification. IVS now offers an improved integrated inspection capability that enables pattern matching using geometric contour features. The functionality allows more robust feature extraction, especially in environments of uneven illumination or obscured objects. This will help functions such as part verification, pattern recognition, label checking and robot positioning.
IVS has also introduced improved data handling across its full range of machines. As a result, large datasets of inspection data and images can now be visualised with live updates of information registers on the machine interface, allowing for faster feedback and control. This allows production and quality managers to have better information on the quality levels achieved in their factories. These advanced features are set to be rolled out across all IVS machines over the coming months.

Earl Yardley, Industrial Vision Systems Director, comments: “We are continuing to innovate and improve our product offering. The additional multi-language features benefit our customers by increasing productivity and allowing our vision system solutions to be deployed globally. Innovation is within our DNA. Our solutions continue to be developed on the very latest machine vision algorithms and industry-defining usability for automated visual inspection machines. These new features will benefit all the industry sectors we work in, from medical device manufacturers through to printing & packaging customers.”

Machine vision trends – what we can expect in 2019

Over the past year, unparalleled levels of developments have occurred in artificial intelligence (AI), big data, 3D imaging, and robotic process automation – none more so than on the factory floor. Industrial Vision Systems Ltd (IVS), a supplier of vision inspection solutions to industries such as medical devices, pharmaceuticals, food & drink, automotive, and printing & packaging, provides vision systems for quality control and robotic vision. This is a particular trend, amongst four others, which IVS believes will be prevalent in 2019.

3D Imaging and Bin Picking

Automation is driving factories to be smart and to reduce the workforce in operations where industrial automation can replace a person. Machine vision has been used for some time for the final quality control inspection, but new markets are opening up with the advent of 3D sensors and integrated solutions for bin picking. Random objects are picked by a robot gripper irrespective of the position and orientation of the part. 3D vision systems can recognise randomly placed parts in large scanning volumes, such as a tote and part boxes. The picking of complex objects in different orientations and stacks is possible thanks to dynamic robot handling. Combining Artificial Intelligence (AI) with bin picking operations allows autonomous part selection, increasing productivity and cycle time, reducing the need for human interaction in the process.

Deep Learning in the Cloud

The coming of 5G data networks for autonomous vehicles provides the ability to perform cloud-based machine vision computation. Massive Machine Type Communications (mMTC) allows large amounts of data to be processed in the cloud for machine vision applications. Deep learning algorithms using Convolutional Neural Network classifiers allows image classification, object detection and segmentation at speed. Development of these new AI and deep learning system will increase over the coming year.

Robotics

2018 was a record year for robot sales according to the International Federation of Robotics with industrial robot sales increasing by 31 per cent. Trends such as human collaborative robots, simplification of use and process learning have helped propel the use of robots in industrial automation. In the future industrial robots will be easier and quicker to program using intuitive interfaces. The human-robot collaboration will support the flexible production of small quantity production with high complexity. The reduction in complexity of use allows the widespread use of robots and vision systems in the mid to long term.

Hyperspectral Imaging

Next generation modular hyperspectral imaging systems provide chemical material properties analysis in industrial environments. Chemical Colour Imaging visualises the molecular structure of materials by different colouring in the resulting images. This allows the chemical composition to be analysed in standard machine vision software. Typical applications include plastic detection in meat production, detection of different recyclable materials and blister pill inspection quality control. The main barrier for such systems is the amount of data and speed required for processing, but the development of faster processes, better algorithms and on camera calibration still make this a hot topic for 2019.
Thermal Imaging Industrial Inspection

Thermal imaging cameras have traditionally been used for defence, security and public safety with far-ranging uses of thermal images for detection. For many industrial applications, such as the production of parts and components for the automotive or electronics industry, thermal data is critical. While machine vision can see a production problem, it cannot detect thermal irregularities. Thermal imagery combined with machine vision is a growing area, allowing manufacturers to spot problems which can’t be seen by eye or standard camera systems. Thermal imaging provides non-contact precision temperature measurement and non-destructive testing – an area of machine vision and automation control set to grow.

Earl Yardley, Industrial Vision Systems Director, comments: “Industry 4.0-related technologies are driving much of the changes that are currently taking place in manufacturing. This applies in all sectors, but it is particularly important in high-specification and highly regulated industries like food & drink, pharmaceutical and medical device manufacturing. There are many reasons for companies moving towards Factory Automation technologies including making production lines more efficient, making more effective use of resources, and improving productivity. I fully expect to see growing demand in this area across many sectors in 2019.”

Many UK workers unconcerned about robots taking their jobs

However, findings reveal some misconceptions about the productive role robots can play in the workplace

A survey of over 2,000 UK workers has shown that many are unconcerned about the impact new technology may have on their current job roles. The research, conducted by Industrial Vision Systems (IVS), a supplier of machine vision solutions to industry, found that 39 percent would be happy if a factory used artificial intelligence robots to make decisions on quality control and a further 10 percent would be very happy.

However, in contrast, the research also found some stark misconceptions about the impact robots and artificial intelligence can have in aiding productivity in the workplace. A quarter of employees (25 percent) stated that if they had a robot colleague assisting them at work, they would feel threatened that they might take their job. 22 percent also said that they would be sad that it’s potentially one less person to talk to in the workplace and another 18 percent said that they would be afraid the robot would make a mistake.

In comparison, just 11 percent said that they were confident that the job would be done well if they had a robot colleague assisting them at work, and 13 percent were generally happy with the thought.

IVS provides vision systems for robots which enable companies to enhance their productivity by utilising robots to assist human workers with inspection processes. This relieves the human worker from what you may call more commonplace work, which means they are then deployed to higher value tasks within the workplace. In the future, production inspection will include space for an operator and a robot to work in partnership as part of the quality control process of manufacturing.

Considering the survey findings, IVS believes that working with collaborative robots has the added advantage of working safely and efficiently in workspaces currently occupied by humans and that the current misconception of working with vision enabled robots could hinder productivity levels in various sectors and industries.

Next Generation Machine Vision Cameras

IVS-NCGi Machine Vision Cameras

The next-generation IVS-NCGi range of digital cameras from Industrial Vision Systems provides a breakthrough in flexibility, performance and ease of use for machine vision inspection. With heightened resolution options for more precision and faster frame rates, the cameras are designed for integration into modern product processes. Its compact form factor easily fits into space constrained manufacturing lines and cells.

With manufacturers relying on dependable and consistent machine vision throughout the production process, these advanced camera heads provide industrial grade inspection capability with much higher resolutions allowing them to handle the most complex inspection and quality control tasks. Full integration with the IVS software platforms make it one of the most flexible vision systems on the market today.

The cameras come ready to be mounted with standard LED lighting options plus a wide range of field-changeable C-mount lenses and industrial autofocus lens options. The powerful IVS software platforms allow simple set-up and quick integration for inspection across all industry sectors. The cameras are ideally suited for presence verification, gauging, surface inspection and optical character recognition. In addition, the cameras fit the standard IVS-SVP IP65 rated housing for integration into food and harsh manufacturing environments.

The IVS-NCGi cameras offer comprehensive and real-time communication between the cameras and factory information systems. IVS vision systems are designed to communicate with all PLCs, master controllers and proprietary factory controls out of the box allowing rapid integration and easy commissioning on the production floor. They offer fast and efficient operation at every stage from image capture to data output.